第一个爬虫-爬取糗百热门段子并存储在 MySQL 数据库中
创建项目
主要为爬取糗事百科上热门段子资源,在Terminal下执行命令,参数为项目名。
1 | scrapy startproject qiubai |
项目目录结构说明
1 | qiubai/ |
明确目标,定义 item
在 Scrapy 中,items 是用来加载抓取内容的容器,有点类似 iOS 中的 model 模型,可以理解成类似于 ORM 的映射关系,但是提供了一些额外的保护减少错误。
在qiubai目录下的 items.py 文件,在后面添加我们自己的 class hotItem,包含了头像、昵称、内容、点赞数量及评论数:
1 | import scrapy |
制作爬虫
Spider 是用户自己编写的类,用来从一个域(或域组)中抓取信息。
他们定义了用于下载的URL列表、跟踪链接的方案、解析网页内容的方式,以此来提取 items。
要建立一个 Spider,你必须用 scrapy.spider.BaseSpider 创建一个子类,并确定三个强制的属性:
- name:爬虫的识别名称,必须是唯一的,在不同的爬虫中你必须定义不同的名字。
- start_urls:爬取的URL列表。爬虫从这里开始抓取数据,所以,第一次下载的数据将会从这些 urls 开始。其他子 URL 将会从这些起始URL中继承性生成。
- parse():解析的方法,调用的时候传入从每一个 URL 传回的 Response 对象作为唯一参数,负责解析并匹配抓取的数据(解析为 item ),跟踪更多的 URL。
接下来定义 Spider,在项目的 /qiubai/spoders 目录下,并设置了 spider 的名字、爬虫的约束范围,及网页文件进行存储
1 | import scrapy |
爬
执行爬虫文件
1 | scrapy crawl hot |
我这里遇到了下面的的问题,导致抓取失败。
1 | 2016-01-07 17:24:03 [scrapy] DEBUG: Gave up retrying <GET http://www.qiushibaike.com/hot/page/1> (failed 3 times): [<twisted.python.failure.Failure <class 'twisted.internet.error.ConnectionDone'>>] |
其实之前是爬的韩寒的新浪博客,并且成功爬了下来。替换成糗百后才才出现了上面的错误,所以我猜想是不是糗百对user-agent进行了限制,所以开始为scrapy爬虫添加随机UA:
1、在settings.py中添加以下代码,注意修改对应自己的项目名称
1 | DOWNLOADER_MIDDLEWARES = |
1 | #!/usr/bin/python |
添加完成之后,再次执行就OK了。可以在项目根目录下看到1和2两个文件,其实里面的内容是html源代码,当然这仅仅是演示爬取的过程,接下来就是对源码进行解析。
以上这个过程主要是我们将使用创建的爬虫 hot,把 start_urls 里指定的每个URL创建了一个 scrapy.http.Request 对象 ,并将爬虫的 parse 方法指定为回调函数,在这里我们仅仅进行了保存操作。然后,这些 Request 被调度并执行,之后通过 parse() 方法返回 scrapy.http.Response 对象,并反馈给爬虫。
取
在基础的爬虫里,这一步可以用正则表达式来抓。在 Scrapy 里,使用一种叫做 XPath selectors的机制,它基于 XPath 表达式。如果你想了解更多 selectors 和其他机制你可以查阅资料:选择器(Selectors)
简单的罗列一下有用的xpath路径表达式:
1 | 表达式 描述 |
下面是一些 XPath 表达式的例子和他们的含义:
- //div[@class=”stats”]: 选择所有包含 class=”stats” 属性的div 标签元素
- //td: 选择所有
元素 - /title/text(): 选择前面提到的
元素下面的文本内容
接下来我们将对应的源码标签解析,并将对象保存在 items 列表中,对象保存段子的作者昵称头像等内容,我们主要解析的就是下面这段内容:
修改我们的Spider中的解析逻辑:
import scrapy
from scrapy.selector import Selector
from qiubai.items import hotItem
class qiubaiSpider(scrapy.spiders.Spider):
name = "hot"
allowed_domains = ["qiushibaike.com/"]
start_urls = [
"http://www.qiushibaike.com/hot/page/1",
"http://www.qiushibaike.com/hot/page/2"
]
def parse(self, response):
sel = Selector(response)
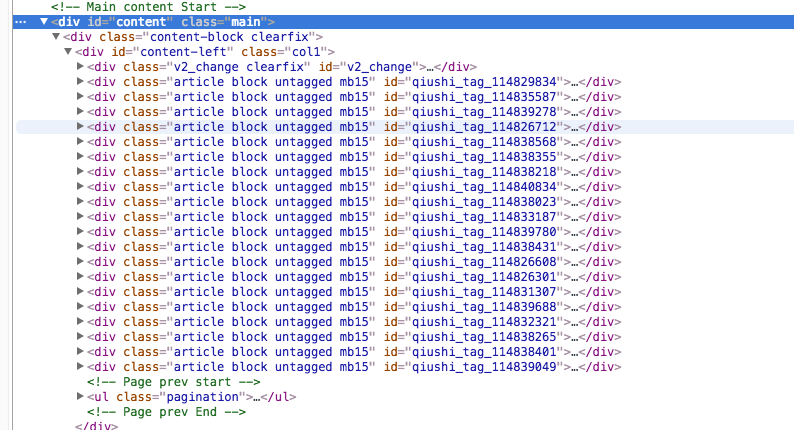
sites = sel.xpath('//div[@class="article block untagged mb15"]')
items = []
for site in sites:
item = hotItem()
userSites = site.xpath('div[@class="author clearfix"]//a')
# 有些时候此标签并不一定存在,需要进行判断
if userSites:
item["avatar"] = userSites[0].xpath('img/@src').extract()
item["nickname"] = userSites[1].xpath('h2/text()').extract()
item["content"] = site.xpath('div[@class="content"]/text()').extract()
num = site.xpath('div[@class="stats"]//i')
item["like"] = num[0].xpath("text()").extract()
item["commentNum"] = num[1].xpath("text()").extract()
items.append(item)
return items
存储爬取的内容
保存信息的最简单的方法是通过 Feed exports,主要有四种数据格式:JSON,JSON lines,CSV,XML。
我们将结果用最常用的 JSON 导出,命令如下:
-o 后面是导出文件名,-t 后面是导出类型。
scrapy crawl hot -o items.json -t json
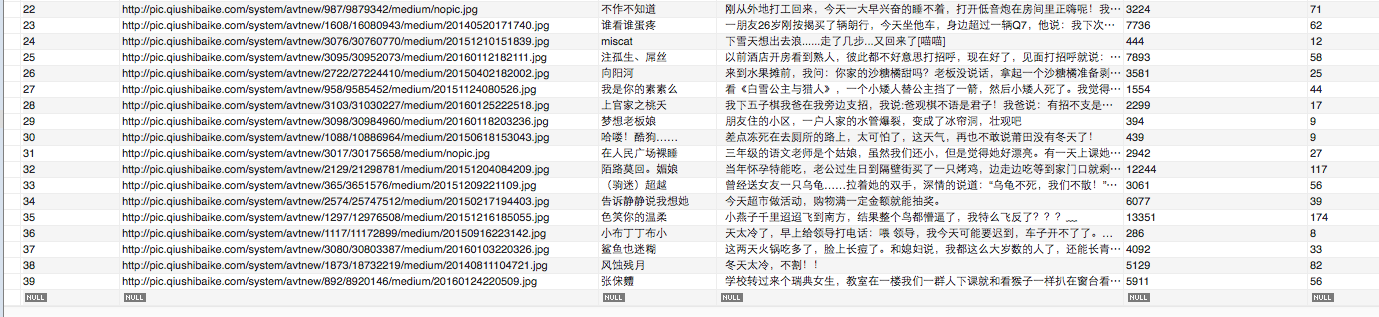
此时就可以在项目跟目录下看到 items.json 文件,可以使用文本编辑器查看了。当然我们更多的时候还是希望保存到 MySQL中便于使用,这时候就需要使用到 pipelines.py 文件了。
当然还需要修改 setting.py 这个文件:将下面这句话加进去
ITEM_PIPELINES=['fjsen.pipelines.QiubaiPipeline']
并且修改在 pipelines.py 文件,修改对应的数据库账户密码,建议制定为 utf8 编码,否则会出现乱码。并且推荐使用这种方法进行数据插入,写 sql 语句出错太难调了。
from scrapy import log
from twisted.enterprise import adbapi
import MySQLdb
import MySQLdb.cursors

class QiubaiPipeline(object):

    def __init__(self):
        self.dbpool = adbapi.ConnectionPool('MySQLdb', db='qiubaiDB',
                user='root', passwd='111111', cursorclass = MySQLdb.cursors.DictCursor,
                charset='utf8', use_unicode=True)

    def process_item(self, item, spider):
        # run db query in thread pool
        query = self.dbpool.runInteraction(self._conditional_insert, item)
        query.addErrback(self.handle_error)
        return item

    def _conditional_insert(self, tx, item):
        # create record if doesn't exist.
        # all this block run on it's own thread
        isExist =tx.execute('select *from information_schema.tables where table_name = "hot"')
        if isExist:
            sql = "INSERT INTO hot(hot_avatar, hot_nickname, hot_content, hot_like, hot_commentNum) VALUES (%s, %s, %s, %s, %s)"
            avatar = item["avatar"]
            param = ""
            # 需要判断头像昵称是否真的存在,当然这个判断条件写的比较简单
            if avatar:
                param = (item['avatar'][0], item["nickname"][0], item['content'][0], int(item['like'][0]), int(item['commentNum'][0]))
            else:
                param = ("", "", item['content'][0], int(item['like'][0]), int(item['commentNum'][0]))
            tx.execute(sql, param)
        else:
            # 如果表不存在则创建
            tx.execute('create table hot(hot_id INT AUTO_INCREMENT PRIMARY KEY, hot_avatar VARCHAR(100) , hot_nickname VARCHAR(100) , hot_content text NOT NULL, hot_like INT NOT NULL,hot_commentNum INT NOT NULL) DEFAULT CHARSET=utf8')

    def handle_error(self, e):
        log.err(e)
接着,执行爬虫命令后查看数据库就可以了,在此之前确保你的 MySQL 服务是启动的: